Exploring Assembly Shop Drawings & Their Types
In the world of engineering, effective communication is essential for the successful creation and assembly of complex systems. One of the most powerful tools in this process is graphic language, particularly assembly drawings.
These drawings serve as universal means of conveying technical ideas, overcoming language barriers, and ensuring that designs are understood by everyone involved in the project.
Whether it’s assembling machines, constructing vehicles, or building intricate systems, assembly drawings play a crucial role in ensuring accuracy and consistency in the final product.
The importance of a precise and accurate assembly drawing cannot be overstated, as even the smallest mistake can lead to significant delays or errors during the assembly process.
Mastering the art of creating assembly shop drawing is fundamental for engineers, as it allows them to communicate detailed specifications, assembly sequences, and component relationships in a universally understood format.
These drawings are essential in guiding the assembly process, ensuring that each part is correctly positioned and fitted, and that the final assembly meets the required standards.
Table Of Content
What is assembly shop drawing?
Types of assembly shop drawing
FAQs
What is assembly shop drawing?
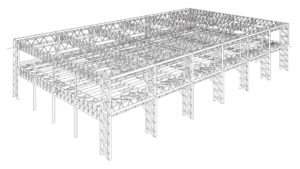
An assembly shop drawing is a detailed technical representation used in manufacturing and construction processes to depict the complete assembly of a device, machine, or structure, along with its individual components. These drawings provide specific instructions for fabrication, assembly, and installation, of a structure ensuring accuracy and standardization.
Assembly shop drawings typically include:
- Component Identification: Labels and part numbers for each element.
- Assembly Sequence: Step-by-step order of how parts are to be assembled.
- Detailed Dimensions: Precise measurements for each component and the overall assembly.
- Materials and Specifications: Information on materials used, tolerances, and finishing requirements.
- Bill of Materials (BOM): A list of all components, including their quantities and specifications.
- Orthogonal Views: Front, top, and side views for clarity.
- Sections and Elevations: Cross-sectional details for intricate parts.
- Weight and Mass Information: Specifications for transportation and handling.
Looking for precise fabrication assembly drawings? Checkout our steel fabrication shop drawings services for greater accuracy and efficiency for your projects.
Types of Assembly Drawing
These drawings serve as a universal visual communication tool between designers, fabricators, and constructors, ensuring a consistent understanding of the construction or fabrication process. Below are the eight common types of assembly drawings :-
1. Design drawing
A design drawing is a technical representation created during the initial stages of a project to conceptualize and illustrate the structure, operation, and interaction of various components within a system or machine. It is used to visualize the overall layout, performance, shape, and clearances of the parts and their assembly.Design drawings often serve as a blueprint for further detailed and assembly drawings, providing essential information about the feasibility and functionality of the design.
2. Detailed assembly drawing
A detailed assembly drawing is a technical illustration that demonstrates how all components of a machine or structure are assembled, along with comprehensive specifications necessary for construction and assembly. It provides precise information on dimensions, materials, joining techniques, and the relationships between components.
Detailed assembly drawings are particularly useful for smaller machines or assemblies with fewer components. These drawings may also include:
- Enlarged Views: Highlighting specific parts or areas to show precise fitting and connections.
- Dimensional Details: All measurements and tolerances required for accurate assembly.
- Material Specifications: Indicating the types of materials to be used.
- Joining Methods: Details on how parts are connected, such as welding, bolting, or riveting.
3. Assembly drawings for catalogues
These are assembly drawings created for inclusion in company catalogues. These drawings highlight only the essential details and dimensions that are of interest to potential buyers.
The purpose of these drawings is to present the product in a visually clear and appealing manner, focusing on key features such as:
- Overall Dimensions: Indicating the size and scale of the product.
- Pertinent Details: Highlighting unique or functional aspects of the design.
- Simplified Views: Omitting unnecessary technical complexities while retaining crucial information.
Assembly drawings for catalogues are designed to effectively communicate product specifications to customers, helping them make informed purchasing decisions.
4. Assembly drawing for instruction manuals
An assembly drawing for instruction manuals is created to guide the reassembly, and installation of a machine or system shipped with the parts disassembled. These drawings are used when a machine, initially in an assembled condition, must be dismantled for inspection, transported, and later reassembled at its destination.
Key features of these drawings include:
- Component Numbering: Each part is assigned a unique number for easy identification during reassembly.
- Step-by-Step Guidance: Clear instructions for disassembly and reassembly sequences.
- Visual References: Detailed views to assist in correctly positioning and connecting parts.
Such drawings are essential tools for ensuring the proper reassembly and functionality of machines after transport or inspection.
5. Exploded assembly drawing
An exploded view drawing shows the components of an assembly separated and suspended in space, arranged in the sequence of assembly. This type of drawing clarifies how the parts fit together to form the final product, making it easier to understand, even for a layman.
Key characteristics of exploded view drawings include:
- Separated Components: Parts are spaced apart to show their relationships and assembly order.
- Assembly Sequence: Illustrates the step-by-step order in which components are to be joined.
- Simplified Visuals: Designed to be accessible for non-technical users.
Exploded view drawings are valuable for providing clear assembly instructions and aids in the identification and replacement of parts.
6. Installation Drawing:
An installation drawing is designed to guide workers for proper assembly or erection of a product. It provides detailed information about how a component or system should be positioned relative to its supporting or adjacent elements for correct alignment and functionality.
Key features of installation drawings include:
- Positioning Information: Specifies the placement of components in relation to one another.
- Dimensional Data: Includes critical measurements and overall dimensions of the assembled unit.
- Hardware Descriptions: Lists fasteners, fittings, and other hardware needed for installation.
- Working Positions: Shows all parts of the machine or system in their operational configuration.
Installation drawings are essential tools for ensuring accurate and efficient assembly, helping workers understand the layout and relationship of parts during installations
7. Schematic drawing
A schematic drawing uses standardized symbols and lines to represent components and their connections within a system as a technical drawing. It focuses on conveying the functional relationships and principles of operation, omitting unnecessary details such as physical appearances.
Key features of schematic drawings include:
- Simplification: Replaces actual components with conventional symbols to make the system easier to understand.
- Standardized Symbols: Uses universally recognized graphical symbols for clarity and consistency.
- Functionality Over Detail: Highlights how components interact rather than how they look.
- Application: Commonly used in fields like electrical engineering, plumbing, and mechanical systems to explain operating principles.
For instance, in an electrical schematic, wires, switches, and circuit components are shown symbolically, making the diagram easy to interpret while focusing on the system’s function.
8. Machine shop drawing
A machine shop drawing is specifically created for machinists or machine operators. It presents detailed information about the size, shape, and machining requirements of the part through a series of orthographic views, ensuring a clear understanding of the component’s function and specifications.
Key features of machine shop drawings include:
- Orthographic Views: Multiple perspectives to fully describe the shape and dimensions of the part.
- Relevant Details: Focuses only on information essential to the machinist, excluding data from earlier stages of production.
- Specific Instructions: Includes dimensions, tolerances, and machining processes required to create the part.
- Variants: Can include forge shop drawings, pattern shop drawings, or sheet metal drawings depending on the production method.
Technical drawings serve as a universal graphic language that bridges the gap between designers, fabricators, constructors, and end-users, enabling precise communication and understanding of complex systems, assemblies, and components. Each type of drawing, whether assembly, design, detailed, exploded, schematic, or installation, fulfils a specific purpose, catering to distinct stages of the manufacturing, construction, or operational process.
FAQs
What is an Assembly Shop Drawing?
An assembly shop drawing is a detailed illustration showing how all parts of a machine, structure, or product fit together. It includes components, dimensions, material specs, assembly sequence, and often a bill of materials for fabrication.
How to Make an Assembly Drawing?
To create an assembly drawing, gather all component details, lay out the assembly, label parts with part numbers, add dimensions, include material specifications, and show the assembly sequence. Provide multiple views for clarity and finalize with proper annotations.
How to Make an Exploded Assembly Drawing?
Position the components separately to show how they fit together. Use arrows to indicate the assembly sequence, add dimensions where necessary, and ensure parts are spaced while illustrating the assembly process.
Conclusion
By providing critical details such as dimensions, materials, assembly sequences, and component positioning, these drawings ensure accuracy, efficiency, and standardization throughout a project’s lifecycle. From guiding machinists in crafting parts to helping laypersons understand assembly through catalogues, technical drawings are indispensable tools that streamline operations, prevent errors, and enhance collaboration across industries.
In essence, the mastery of creating and interpreting these drawings is fundamental to achieving innovation and excellence in engineering, manufacturing, and construction.


